
The Best Ableton Live 12 Settings to Change First
Nov 09, 2026
In this article I'm going to take a look at the best Ableton Live 12 settings to change first.
We'll go through every tab in the Settings window, covering audio and latency, buffer size, MIDI controllers, plug-ins, the record, warp and launch defaults, and the new settings added in Live 12.3 and 12.4.
Some settings have changed in recent versions of Live, so this covers the new ones too.
By the end of this article, you'll have Ableton Live 12 set up properly, from the audio settings through to your own default template.
Let's get into it.
Key Takeaways for Ableton Live 12 Settings
- Audio settings. Pick the right driver and output device so sound comes out of Live, and keep the sample rate at 44.1 or 48 kHz.
- Latency and buffer size. Lower the buffer to cut latency, raise it to run more plug-ins, use Reduced Latency When Monitoring if lag persists, and leave Driver Error Compensation alone.
- MIDI settings. Turn Track and Remote on for your controller's input and Sync on for its output, then set it as a control surface.
- New settings in Live 12.3 and 12.4. Hide or relocate Splice, and Extensions, which are in public beta.
- Record, warp, launch and template settings. The defaults for every new recording and clip, and how to save your own default template.
How to Set Up Your Audio Interface in Ableton Live 12
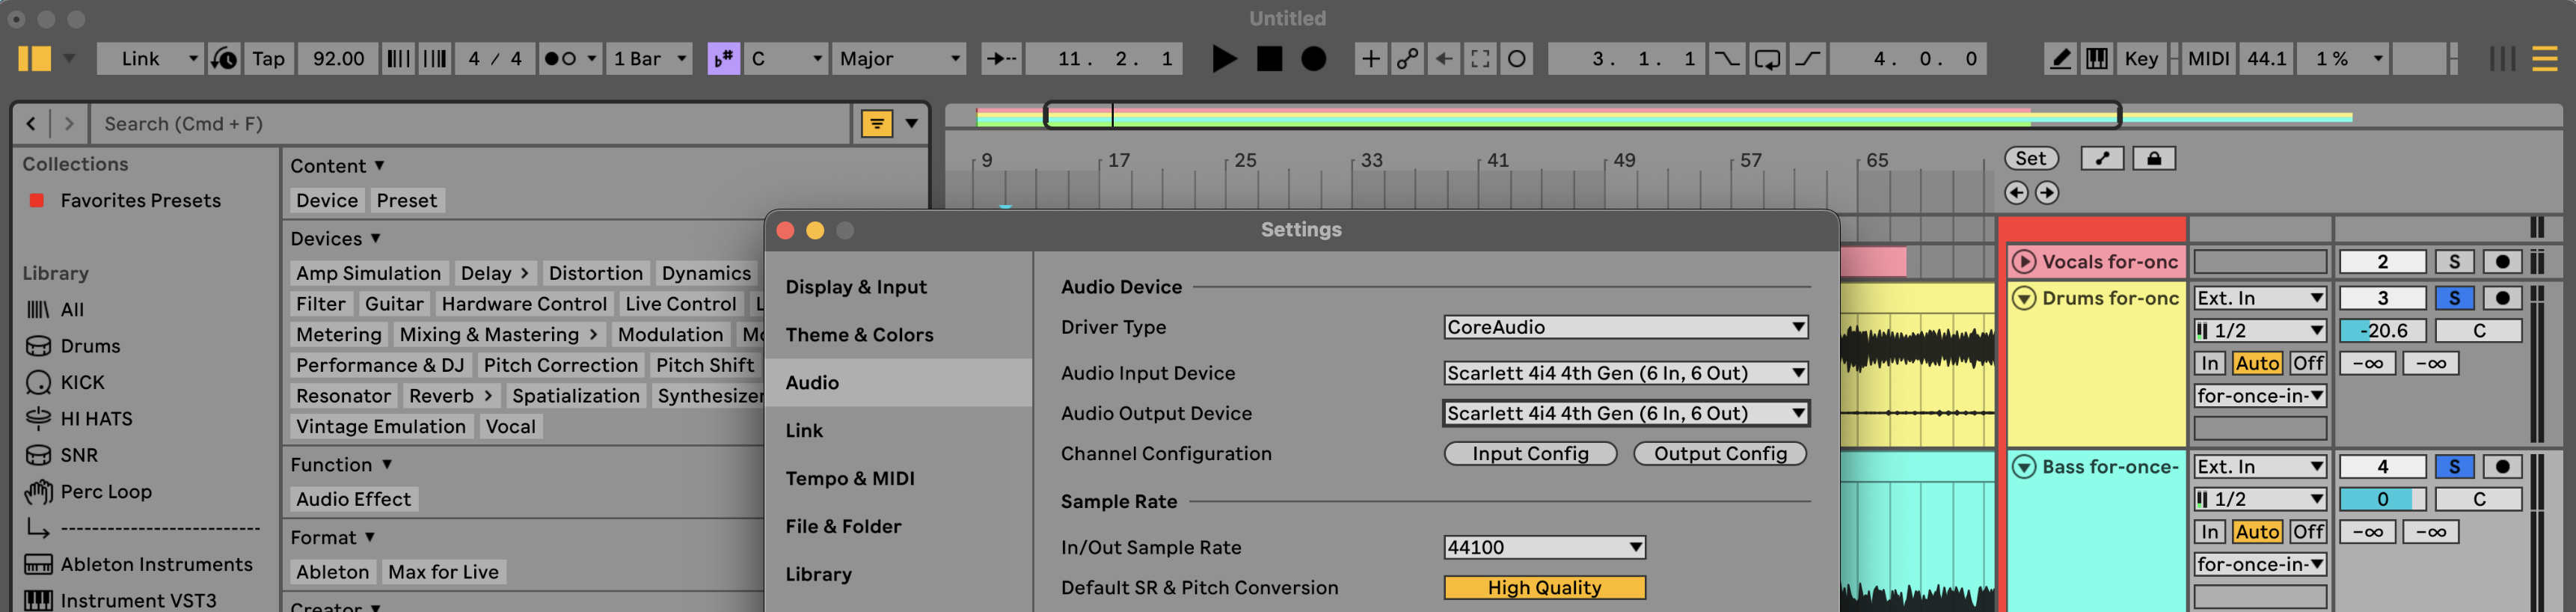
The biggest problem when you start out in Ableton Live is silence.
You've downloaded it, you've hit play, and there's no audio.
To fix it, open Settings with Cmd and comma on Mac, or Ctrl and comma on Windows.
You'll need that shortcut a lot, so remember it.
The tabs down the side take you to different parts of Live's settings.
Go to Audio.
First up is Driver Type.
On a Mac, set it to Core Audio and you're done.
On Windows, choose an ASIO driver, which keeps latency as low as possible.
If your audio interface came with its own ASIO driver, use that one.
If it didn't, the best one to grab is ASIO4ALL, and it's free.
Next is Audio Output Device.
This is a list of all the ways to get audio out of Live to your ears.
Select whatever you're listening through.
If that's your MacBook or computer speakers, select those.
If you're using an audio interface, select that.
To test it, turn on Test Tone further down the tab.
If it sounds like somebody's died, you've got audio coming out.
For Audio Input Device, you usually want to keep it the same as the output.
That keeps latency to a minimum.
You can select other inputs too.
If your iPhone is hooked up on iCloud, you can record it straight in, with no need for a mic.
Next is Sample Rate.
The standard is 44.1 kHz, which Live shows as 44100.
48000 is next, and it keeps going up from there.
I generally keep mine at 44.1 or 48.
Going higher doesn't always mean it's better.
You get bigger file sizes, your computer works harder, and it eats up your storage.
The higher rates are to do with sound outside the range of human hearing, which you pick up in live rooms or orchestral recordings.
If you make electronic music at home inside your DAW, maybe recording a guitar or a vocal, you won't need it.
44.1, or 48 if you want to be a little bit posh.
How to Reduce Latency in Ableton Live 12 (Buffer Size Explained)
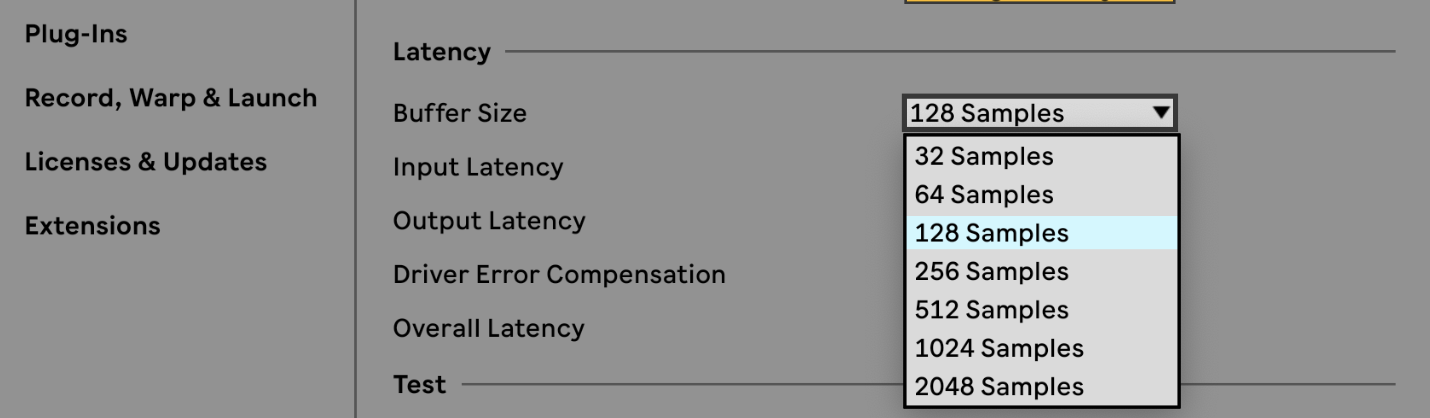
Buffer Size has nothing to do with audio quality.
It affects latency, which we all have to deal with at some point.
On my setup, input latency is 6.2 ms and output latency is 6.1 ms, which makes a round trip latency of 12.2 ms.
That's not too bad, though you might feel it a little.
There is no zero latency audio interface at the moment.
Latency is the time it takes your computer to convert audio into digital and back again, known as A/D and D/A conversion.
Buffer Size is how quickly your computer deals with all that information.
Dropping it to 32 samples feels great.
That puts a lot of pressure on your computer.
With lots of programs open in the background, the audio starts crackling, and it sounds broken.
Increase the buffer size until you don't hear the crackling.
On my setup, 64 samples gives 7.87 ms, and 128 only adds around 5 ms, which is a very small amount.
You can also increase latency on purpose.
The buffer goes up to 2048 samples, which brings in 99.3 ms of latency.
That takes the pressure off your computer.
So when you've got crackling with loads of plug-ins and nothing left to record, bump the buffer size up and throw in as many plug-ins as you need.
If you're still getting latency while recording, go to the Options menu and turn on Reduced Latency When Monitoring.
The thing most people get wrong here is adjusting Driver Error Compensation.
Leave it alone.
It's for when recorded audio or MIDI drifts slightly out of time with the grid while monitoring is turned off.
In other words, don't worry about it for now.
Ableton Live MIDI Settings Explained (Track, Sync and Remote)
With audio coming out, the next job is getting your MIDI controller sorted.
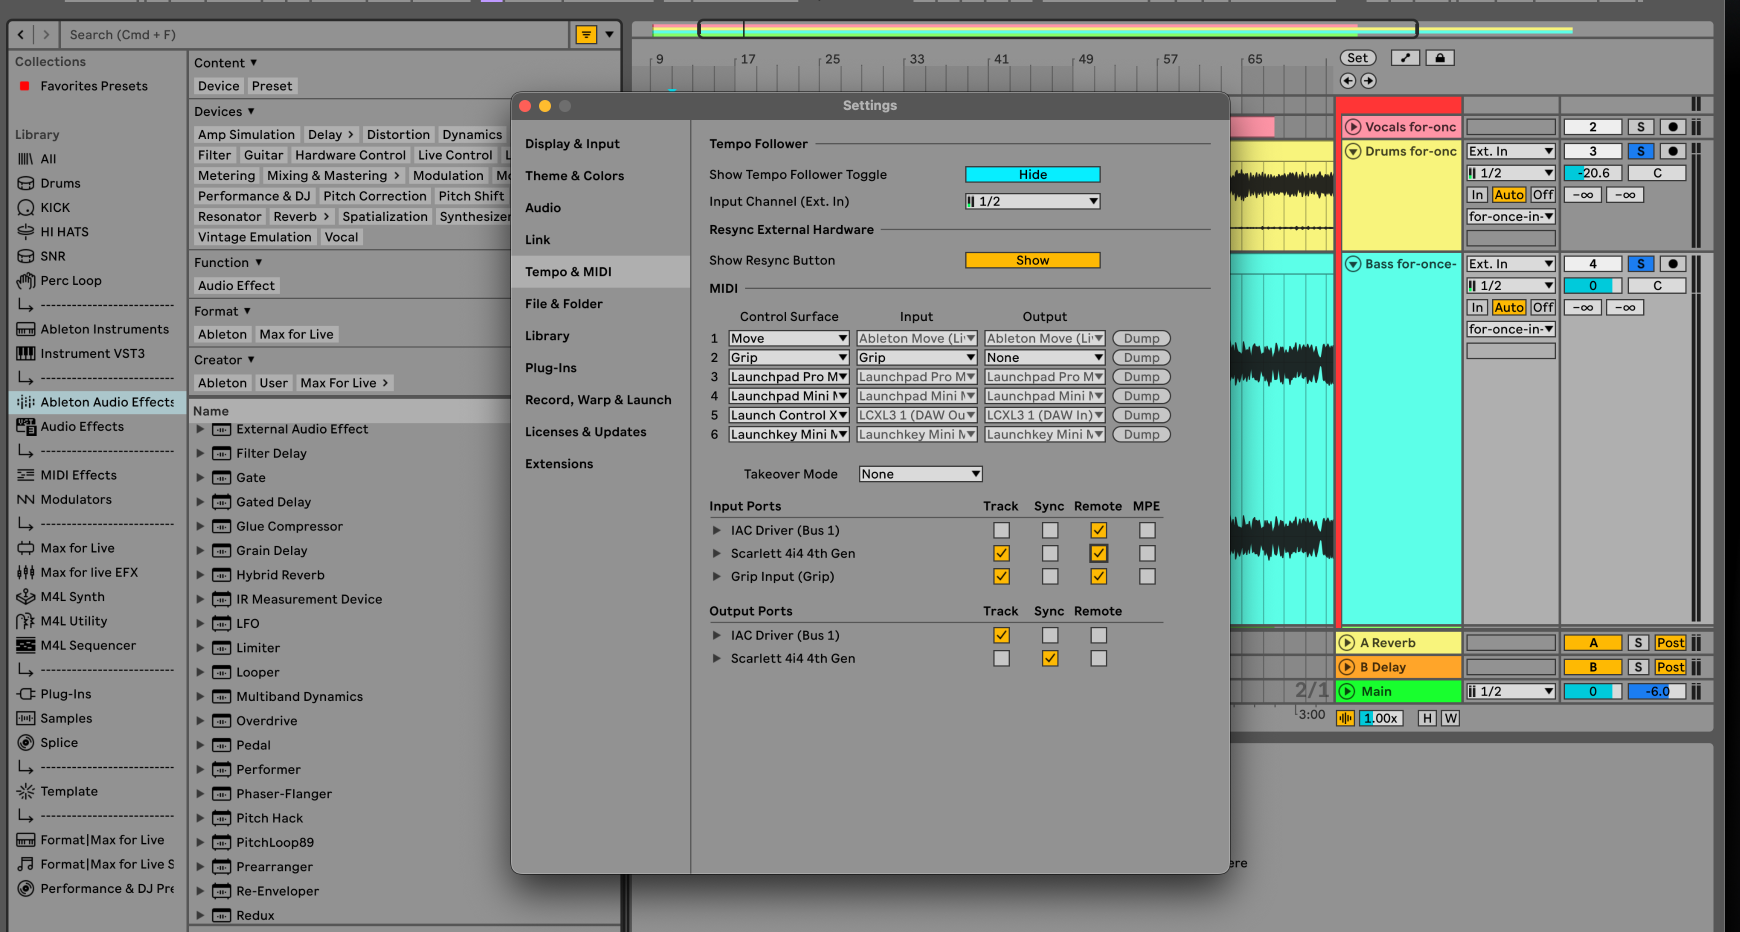
Go to the Link, Tempo and MIDI tab.
The main part to worry about is the MIDI input and output ports.
Plug your controller in over USB.
On a Mac, it asks for permission, so allow it.
Some controllers, like the Launchkey Mini MK4, show up with 2 ports, a MIDI port and a DAW port.
On the input side, make sure Track and Remote are on for both.
Track lets you play notes on the keyboard into a software instrument.
Remote lets you MIDI map dials, encoders and buttons to settings in Live.
Without them on, you can't do either.
On the output side, turn Track off, keep Sync on, and turn Remote off.
There are no sounds in a MIDI controller and nothing on it to control, so there's no need for Track or Remote.
Sync lets you sync any arpeggiators or sequencers on your controller.
Go into your controller's settings, set the clock source from internal to external, and you're away.
If your controller has lit pads, you can use them to launch clips without mapping them.
Select the controller as a Control Surface, then set its input and output to the DAW ports.
A blue line appears around your scenes and clips in session view, and the pad lights change to match what you see in Live.
You can now launch scenes and clips from the controller, and play and stop them.
There's more on getting a controller working in how to set up your MIDI controller in Ableton Live.
Ableton Live 12 Display and Theme Settings
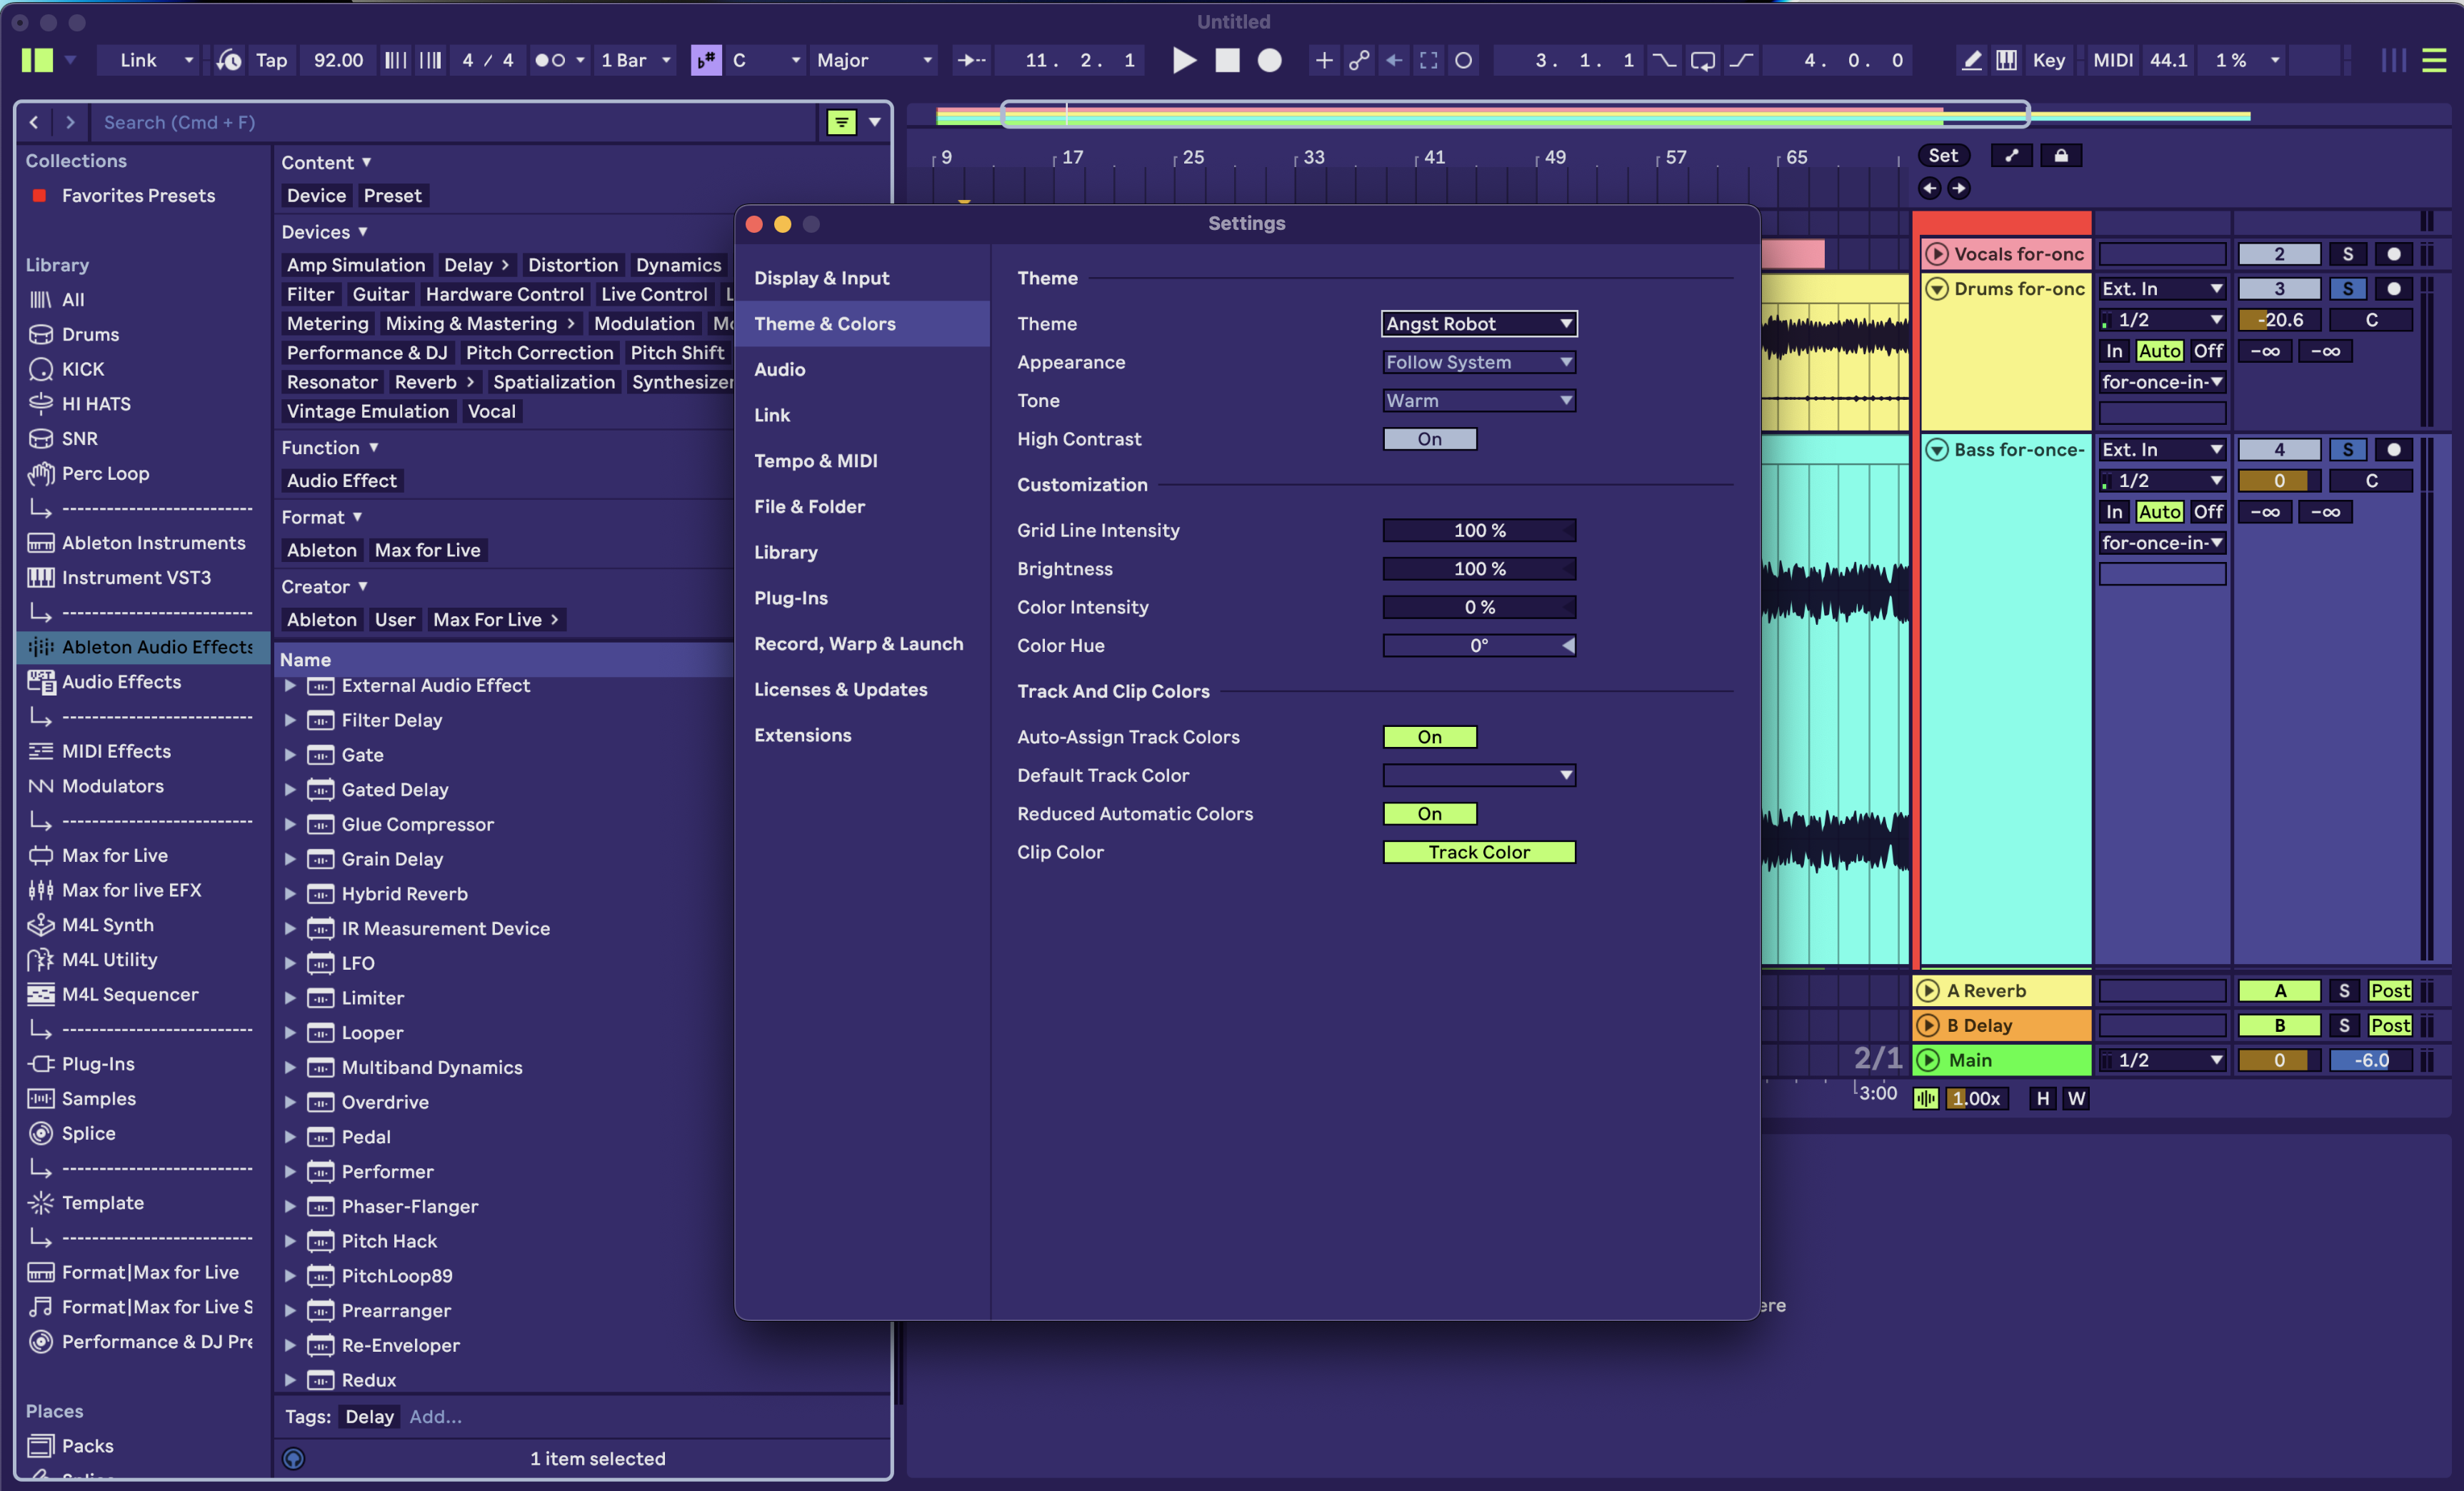
These are small settings, but they make a big difference.
In the Display and Input tab is 1 of my favourite settings, Draw MIDI Notes with Pitch Lock.
To see why, turn it off, open a MIDI clip, and press B for the pencil tool.
Now try drawing notes across the clip.
The notes go up and down with your hand.
That used to happen to me all the time drawing hi hats, and I'd have to go back and remove the wrong ones.
You can hold Alt while you draw to lock the pitch.
Turn Draw MIDI Notes with Pitch Lock on and it's like holding Alt all the time.
Now you can draw all the way across with 1 hand.
When someone showed me that, I told them they'd changed my life.
Next is the Theme and Color tab.
Live needs to look good, right?
The theme menu has the default Ableton theme and a few others.
1 of them is very bright, so if you love migraines, that's the one for you.
Classic Medium Dark is 1 of my preferred themes, and Classic Medium Light is nice too.
Grid Line Intensity sets how strong the grid lines are inside a MIDI clip.
100 percent is usually fine.
Colour Intensity turns everything pink.
Auto Assign Track Colours is on by default, so Live picks track colours at random.
If you want everything the same colour, you can choose your own.
I'm not bothered by it, but it's nice to know it's there.
That's why the other name for settings is preferences.
I keep Reduce Automatic Colours on, which limits the range Live picks from so it's not too crazy.
Clip colour can follow the track colour or be random.
You can also download custom skins.
The default theme has its own options for high contrast, warm, cool or neutral tone, and following your system's light or dark mode.
Some of those options are greyed out on the Classic themes.
Ableton Live 12 File and Folder Settings (Plug-ins and Sample Editor)
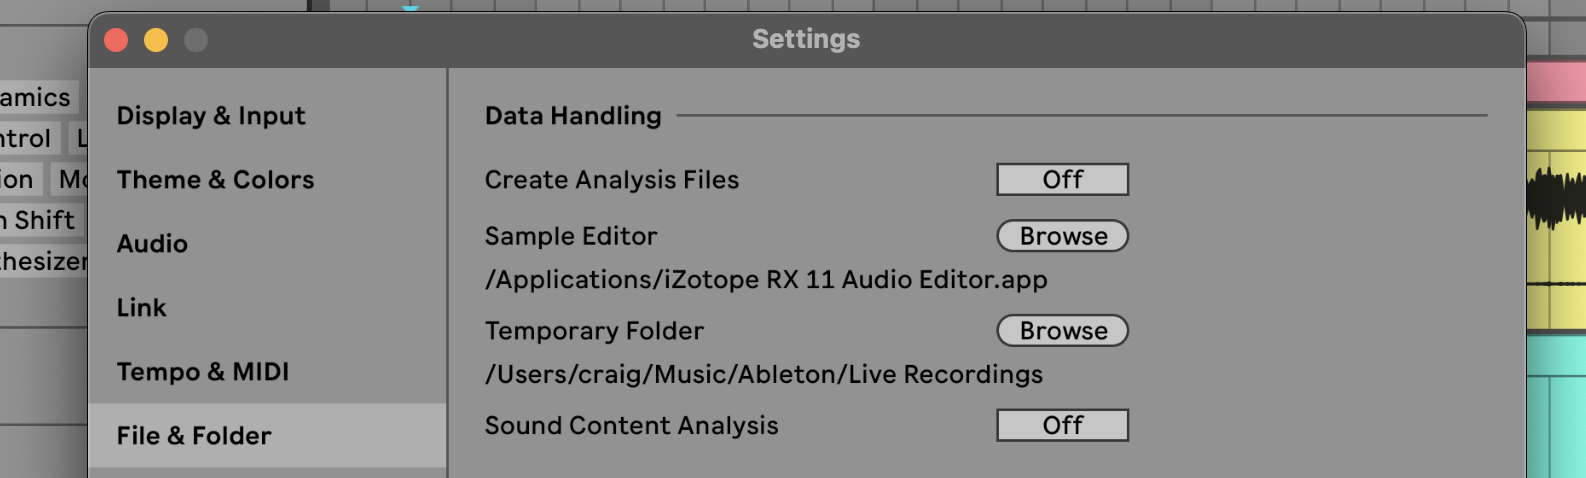
In the File and Folder tab, the first setting is Create Analysis File.
I turn this off.
With it on, every time you export something, Live puts a small extra file next to it.
That's the analysis file.
It's useful if you bring the audio back into Live, because it remembers warp and tempo settings if you've done heavy warping.
If you're not bringing things back into Live much, turn it off.
It annoys me when I'm exporting stems for a show and end up with loads of analysis files to delete as well.
Next is Sample Editor, which most people miss.
Say you've recorded a sample and it's popping.
You want to remove the pops, but you don't want a CPU heavy plug-in on the track all the time.
You could bounce it out and bring it back in.
The other option is to set your sample editor.
Hit Edit on the sample and Live opens it in the program you've selected.
I use RX, so the sample opens there and I fix the pops.
The full round trip is in how to use iZotope RX with Ableton Live.
It also works with Melodyne for tuning.
Then the Plug-Ins tab.
This catches people out when they first get into Live.
Live doesn't bring your external plug-ins in automatically.
You need to turn on what you want to bring in.
Turn on Audio Units version 2 or 3, VST2 System Folders and VST3 System Folders.
If you haven't moved your plug-ins into a custom folder, or you don't know what a custom folder is, choose system folders.
Press Rescan and Live rescans them all.
Go to Plug-Ins in the browser and they'll be there.
This tab also has options for plug-in windows.
Auto Open Plug-in Windows is worth turning on.
With it on, dragging a plug-in like Pro-Q 3 onto a track opens its window straight away.
It's up to you, but I like it on.
Auto Hide Plug-in Windows closes a plug-in window when you select another one.
I don't like it, because I like them open all the time.
Next is a controversial one, Collect Files on Export.
It deals with what happens when you drag clips or tracks from a project into your User Library.
The options are Never, Always and Ask, and it's set to Always.
I put it on Ask.
Sometimes the files are already in your User Library or on an external hard drive, and dragging them in only duplicates them.
With Ask on, Live asks where to collect files from: other projects, the User Library, or factory packs.
You can turn off the files you already have, like Splice loops already in your Splice library.
Live then references where they're stored instead of copying them, which frees up space.
If you find that confusing, keep it on Always.
You can also change where your User Library is stored.
By default it's on your computer's hard drive.
Storage is at a premium these days.
If you've got an external hard drive you don't really use, like a 1 TB one, you can make it your User Library.
It always has to be plugged in, but it frees up storage on your computer, especially if your User Library is getting full.
Ableton Extensions and Splice Settings in Live 12.3 and 12.4
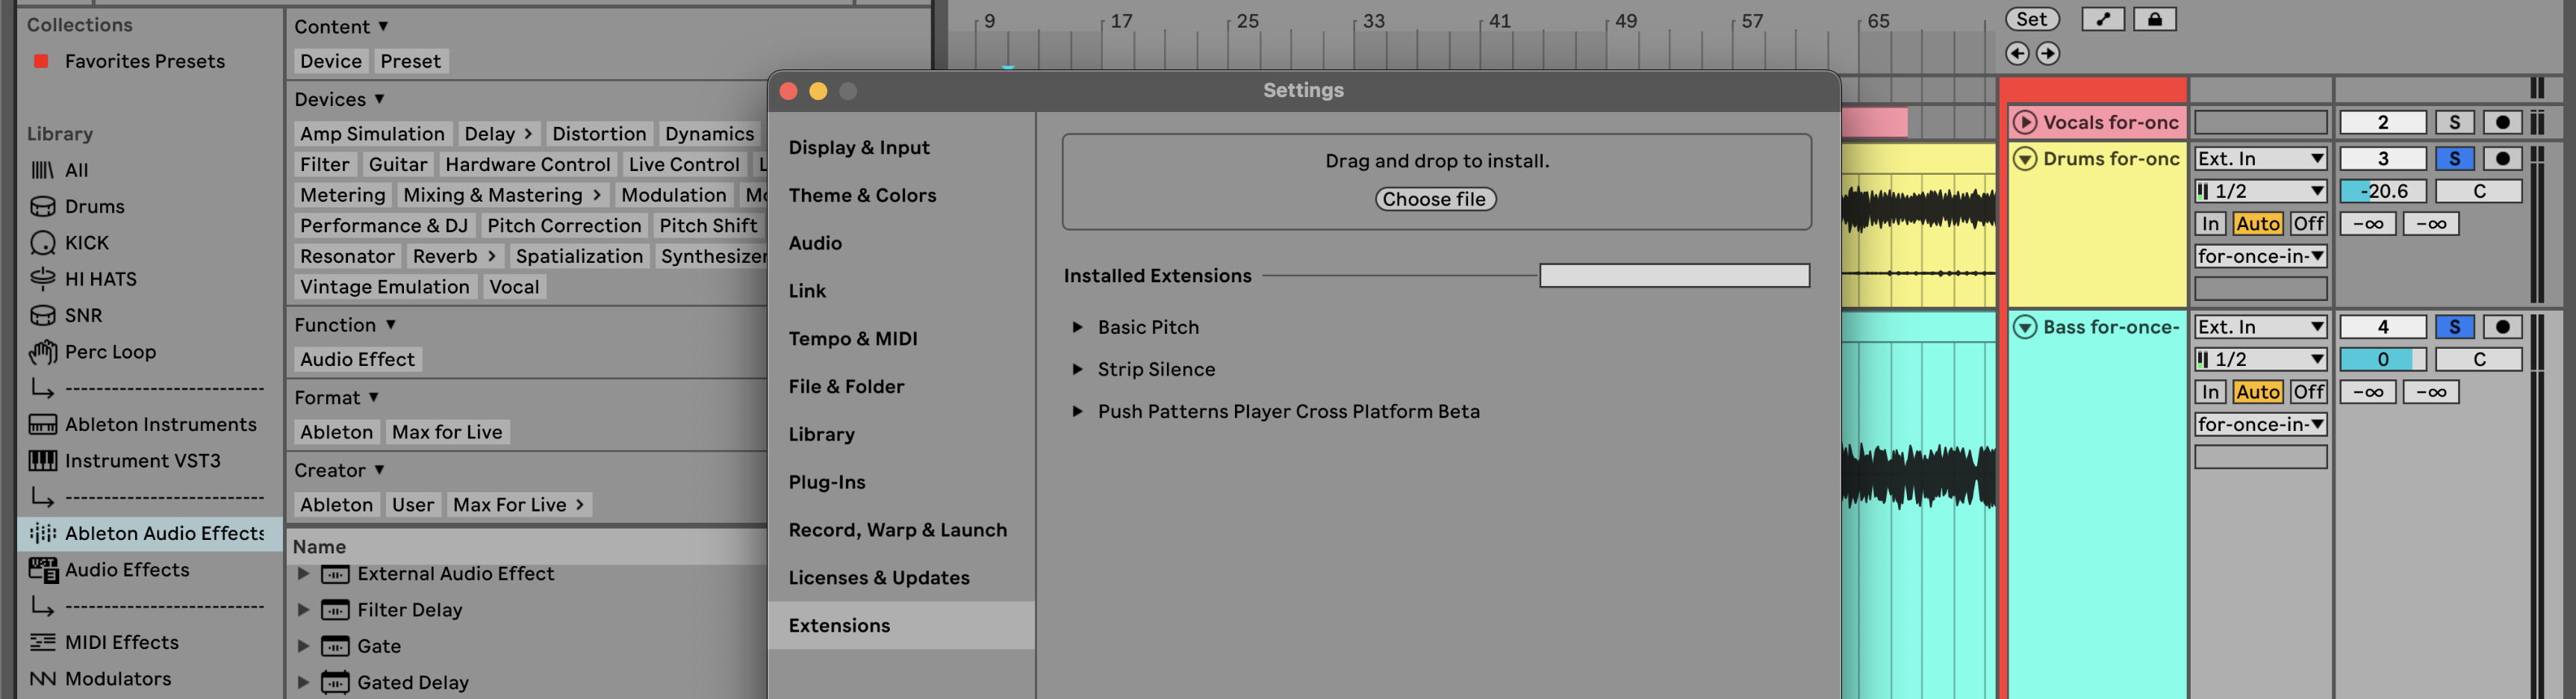
There are now options to show Cloud, show Push and show Splice.
Splice was introduced in Live 12.3.
A lot of people don't like it, and I don't know why, but you can turn it off.
You can also select where Splice files go.
Mine go to the User Library.
The other options are the current project or a custom folder.
Your custom folder could be an external hard drive if you're trying to save storage space, which at the moment is a luxury.
Then there's Extensions.
At the time of writing, Extensions are in public beta, but they'll be released soon.
This tab is where you install them.
Someone has set up a library of Live extensions, and most of them are free.
Download the one you want and drag it to where it says drag or install.
Then right click at the top of a track and your extensions are there.
I made 1 for my Ableton Live, Push 3, Live Performance and Ableton Accelerator courses.
It opens the lessons in a floating window inside Live.
You can resume a course, resize the window to the video or shrink it into a corner, and it stays put when you click back into Live.
So all your lessons are inside Live.
Ableton Live Record, Warp and Launch Settings
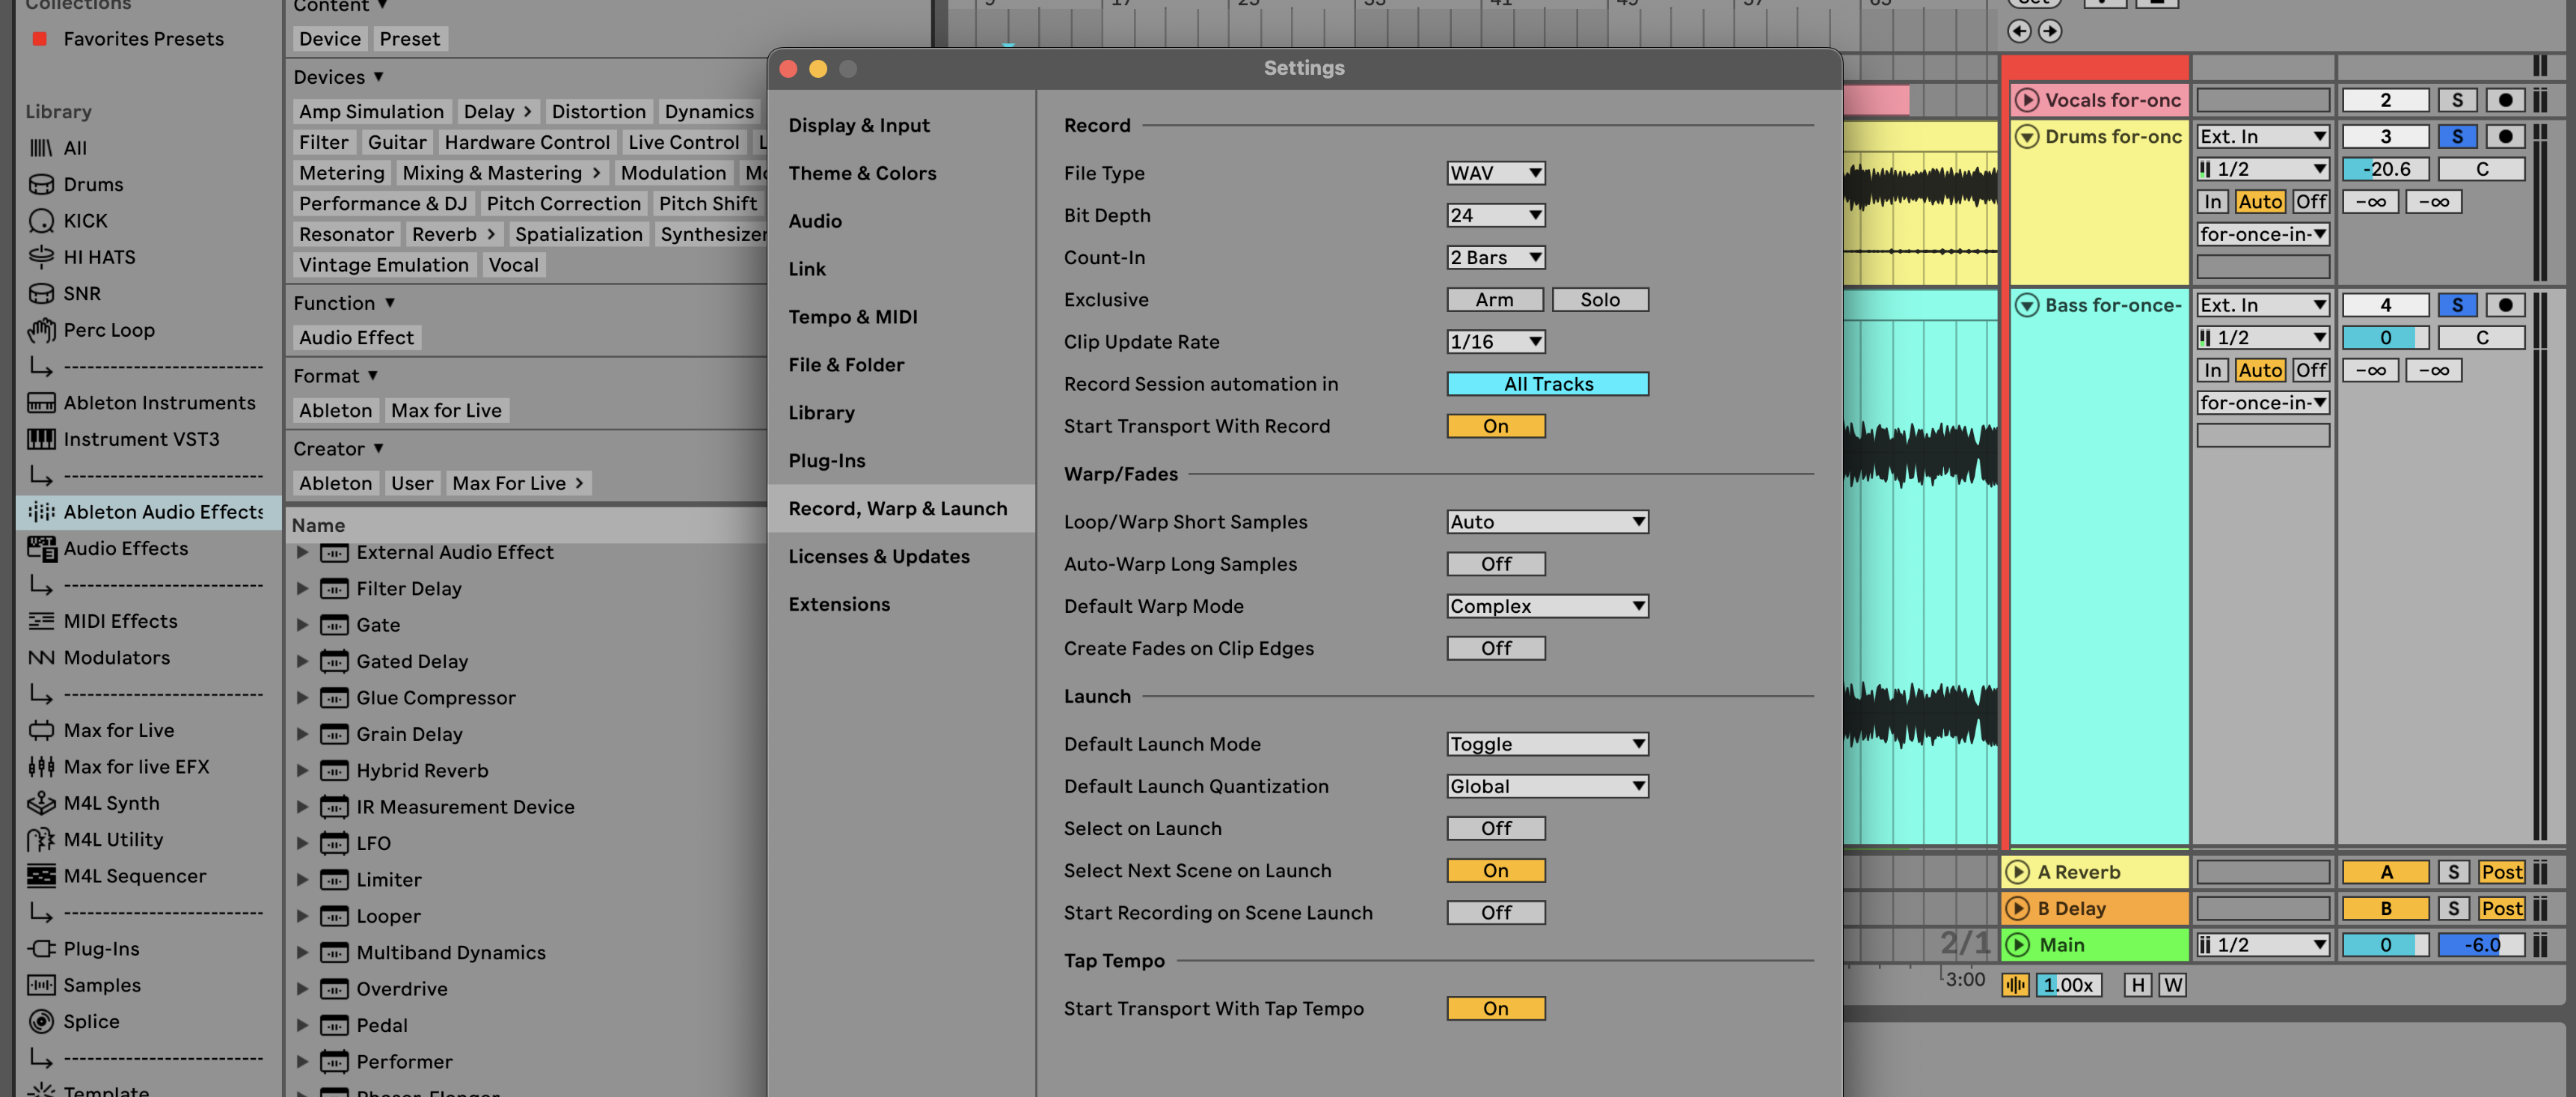
File Type lets you record as WAV or AIFF.
They sound the same, and I prefer WAV.
Bit Depth is only to do with recording in.
Only select 32 if your audio interface can record at 32 bit.
If not, keep it at 24, which is the industry standard.
Count In I always like a bit of, so I set it to 2 bars.
Exclusive Arm and Solo is so annoying when you first start out.
It means you can only have 1 track armed or soloed at a time.
You can hold Cmd to get around it, but I find myself holding Cmd all the time.
You can turn it off here.
Record Session Automation means every track can record session automation, even when not all of them are armed.
It's handy to have, so I keep it on.
Start Transport with Record I keep on as well.
Loop/Warp Short Samples goes to Auto, which is the default.
Turn Auto Warp Long Samples off if you're importing multitrack stems for a song, to mix or to perform with in Live.
With it on, Live treats every audio file as a separate song and warps them all out of sync with each other.
They were exported in sync, so bring them back in that way.
The only time to turn it on is if you're DJing in Live with full songs and you want them in sync with everything else.
Default Warp Mode depends on what I'm working on.
If you're working with a lot of loops, set it to Beats, which is the default.
For a live set with a lot of harmony and vocals, set it to Complex, which sounds a lot more transparent when you shift the tempo.
Turn Create Fades on Clip Edges off.
It's a nightmare with loops, because loops from Splice have already been edited to loop well.
This setting puts little fades on the edges of clips, which takes the transient off the very first beat.
Only turn it on if you're making and cutting your own loops and getting pops and clicks at the ends.
Default Launch Mode goes from Trigger to Toggle.
With Toggle, press a clip to play it, and press it again to turn it off.
Trigger keeps relaunching it, which never made sense in my head.
If I press it, I want it on, and if I don't like it, I'll turn it off.
Turn Select on Launch off.
Say you're adjusting an Auto Filter on 1 track and you launch a clip on another.
The filter disappears, because Live selects the track you launched.
Turn it off and the filter stays.
This is especially good on the Push 3, which works exactly the same, especially standalone.
The settings worth changing on the Push itself are in Ableton Push 3 settings you should change right away.
I keep Select Next Scene on Launch on.
Press Enter on a scene in session view and it launches it and selects the next 1, so you can use Enter to move through your scenes.
How to Set a Default Template in Ableton Live 12
Another setting that gets missed all the time is in the File menu.
It's Save Live Set as Template, and it's good if you're using the same things again and again.
It starts with default presets.
Set up a device like EQ Eight the way you like it and save it as the default preset.
It loads with those settings every time.
You can do the same with tracks.
Create a new audio track, drag EQ Eight onto it, right click and choose Save as Default Audio Track.
Now Cmd and T creates a new audio track with EQ Eight already loaded.
The same works for MIDI tracks.
If you find yourself using the same things inside every project, save a template.
Go to File and choose Save Live Set as Template.
Live gives you the option to collect files from elsewhere, because it's a template.
Say yes, but don't collect files from the User Library or factory packs, because they're already there.
The template I've been using a lot recently is called Ableton OS.
It has a drum track ready to go, with the clap as well.
It has an 8 bar MIDI clip set to the key for bass, and the same for pads.
It has a bunch of sounds ready to go, including airy slow pads, atmos and a lead.
It has loop tracks ready for Splice, gained down to minus 8 dB so loops come in a lot quieter.
There's a sidechain track that triggers the compressors on the buses.
There's a bunch of sends and returns.
You can save it as your default set, so every time you open Live you don't have to set anything up.
The problem with creating your own template is knowing what to put in it in the first place.
Mine came from years of building a workflow and understanding what needs to be in there to get music happening fast without overcomplicating everything.
I've written up how I built my default set and how it all works.
Final Thoughts on Ableton Live 12 Settings
Start in the Audio tab and get sound coming out, with the buffer size as low as your computer allows without crackling.
Then get your MIDI controller sorted.
The rest of these Ableton Live 12 settings are small, but they make a big difference.
If you'd rather have someone walk you through the whole setup, the first module of my Ableton Live 12 course covers packs, plugins and preferences.
Grab the free Ableton OS template and start from a session that's already set up.
Frequently Asked Questions
What is the shortcut to open settings in Ableton Live 12?
Press Cmd and comma on Mac, or Ctrl and comma on Windows.
That opens the Settings window, which is also known as Preferences.
The tabs down the side take you to each area, from audio and MIDI through to the record, warp and launch defaults.
You'll use that shortcut a lot, because this is where you sort out audio and MIDI problems.
It's worth remembering from day 1.
What is a good latency in Ableton Live?
On my setup, a round trip latency of 12.2 ms is not too bad, though you might feel it a little.
There's no audio interface with zero latency at the moment.
Lower the buffer size to bring latency down, and stop before the audio starts crackling.
Dropping to 64 samples takes it to 7.87 ms, and 128 only adds around 5 ms.
If you still feel lag while recording, turn on Reduced Latency When Monitoring in the Options menu.
What sample rate should you use in Ableton Live?
44.1 kHz is the standard, and Live shows it as 44100.
I keep mine at 44.1 or 48.
Going higher doesn't always make it sound better.
You get bigger files that eat your storage, and your computer has to work harder.
Higher sample rates are to do with sound above the range of human hearing, picked up in live rooms or orchestral recordings.
If you make electronic music at home and record the odd guitar or vocal, 44.1 or 48 is all you need.
What bit depth should you record at in Ableton Live?
Record at 24 bit, which is the industry standard.
Bit depth only affects audio you record in.
Only choose 32 bit if your audio interface can record at 32 bit.
The setting is in the Record, Warp and Launch tab of Live's Settings, along with the file type you record to.
WAV and AIFF sound the same, so I record to WAV.
Why are my plug-ins not showing up in Ableton Live?
Live doesn't bring your third party plug-ins in automatically.
Open Settings, go to the Plug-Ins tab, and turn on the formats you use: Audio Units, VST2 System Folders and VST3 System Folders.
If you haven't moved your plug-ins into a custom folder, use the system folders.
Press Rescan and Live scans them all.
They then appear under Plug-Ins in the browser.
Should you use Beats or Complex warp mode in Ableton Live?
It depends what you're working on.
For loops, use Beats, which is Live's default.
Splice loops and writing ideas work well on Beats.
For material with lots of harmony and vocals, like a live set, Complex sounds a lot more transparent when you change the tempo.
You can set the default warp mode in the Record, Warp and Launch tab.
I switch between the 2 depending on the project.
Can you move the Ableton User Library to an external hard drive?
Yes.
In Live's Settings, you can change where your User Library is stored.
By default it sits on your computer's hard drive.
If you've got an external drive you don't use much, like a 1 TB one, you can make it your User Library and free up space on your computer.
The drive always has to be plugged in.
You can also send Splice downloads to a custom folder on an external drive.

About the Author
Craig Lowe is a professional touring playback engineer, Ableton Live specialist and educator based in the UK.
He has over 10 years of teaching experience, online at Push Patterns and at universities including ICMP, BIMM, ACM and ThinkSpace Education.
His Ableton programming credits include Sam Fender, Melanie C, Years & Years and Skunk Anansie.
He runs Push Patterns, where over 1,000 students have learned to produce and perform with Ableton Live, at pushpatterns.com.
If you are interested in learning Ableton Live 12 or the Push 3 in a bit more detail, check the course here:
