
How to Write Chord Progressions in Ableton Live (Without Music Theory)
Jul 19, 2026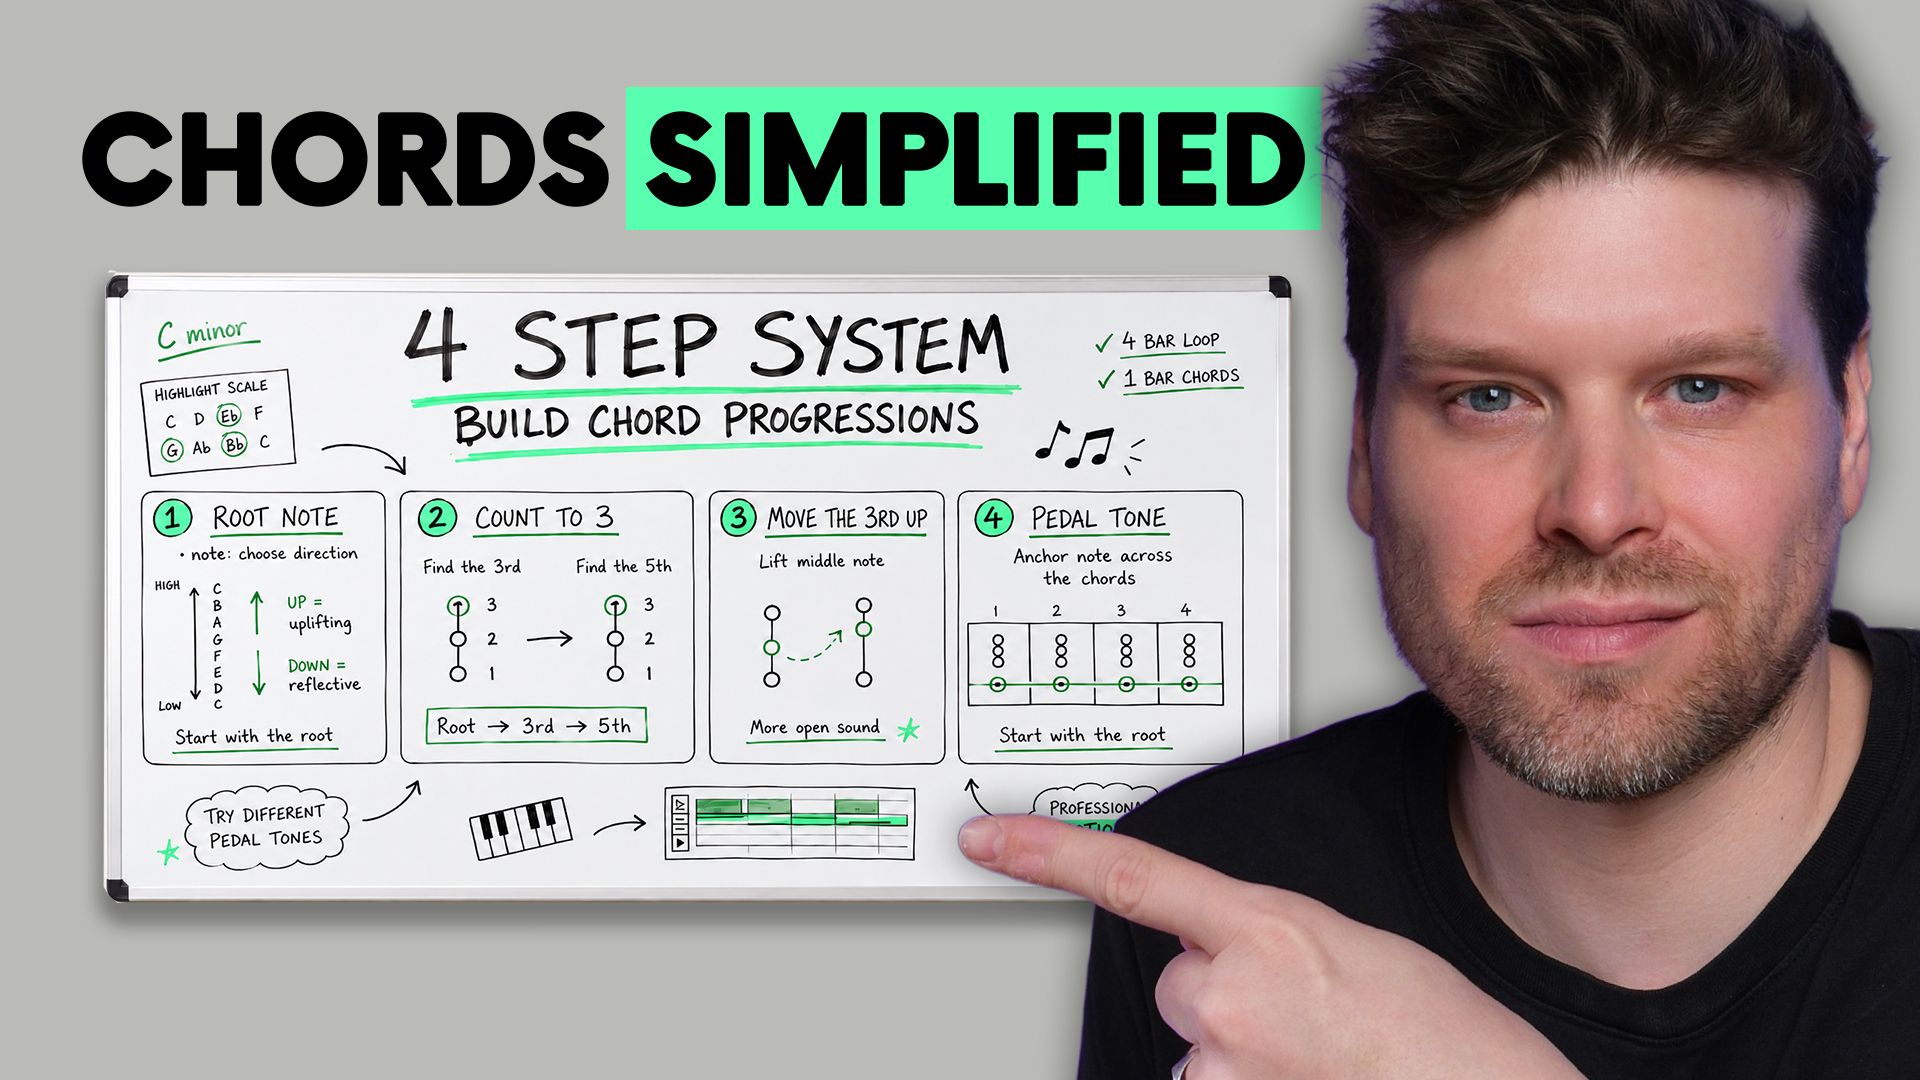
This article shows you how to write chord progressions in Ableton Live.
We'll look at using Ableton's built-in Scale Awareness feature and a 4-step system built to create professional sounding chord progressions with minimal to no music theory required.
The same 4-step sequence I have taught to thousands of students online at Push Patterns and in some of the UK's top universities like ACM, BIMM, ICMP, Waterbear, NHAM, and Tring Park Performing Arts School.
I have seen a magical transformation with students who have no prior music theory or production knowledge.
By the end of this article, you'll know how to create a 4 bar progression in any key, built from scratch, that sounds like a professional keys player made it.
Not like you clicked around aimlessly in an empty MIDI clip.
Let's get to it.
Key Takeaways for Chord Progressions in Ableton Live
- You can write chord progressions in Ableton Live without music theory. Scale Mode and Fold to Scale embed the theory, so every note you click is in key.
- The 1 3 5 rule builds every chord. Start on a root note, count to 3 for the third, then count to 3 again for the fifth.
- Work in a minor key for electronic music. Major can sound cheesy, and minor gives you more evocative progressions.
- Inversions are the fastest route to a professional sound. Move the middle note of each chord up an octave and the progression opens up.
- A pedal tone ties the progression together. Start with the root note up the octave, then nudge it until it feels right.
How to Set Up Scale Mode in Ableton Live for Chords
Scale Mode is the reason you don't need music theory for this.
Set it up once and Ableton only shows you notes that work.
Choose your key first.
I'm using C minor.
When you start out, most advice tells you to work in a major key.
For electronic music, major sounds a bit cheesy.
Minor keys give you far more evocative progressions, so minor is where we're starting.
Turn on Scale Mode for your clip, set the root note to C and the scale to Minor.
Then turn on Highlight Scale.
Ableton highlights every note that belongs to C minor in the piano roll.
You can go a step further and press the Fold to Scale button.
That tucks away every note that isn't in the key.
Now the piano roll only shows you right notes.
If you've tried writing chords before by clicking on random lines and hoping, this is the fix.
The music theory is embedded.
You don't have to think about it again.
How to Create a Four Bar MIDI Clip for Your Chord Progression
Double-click an empty clip slot on your new MIDI track.
Ableton gives you a 1-bar clip.
We want 4 bars.
Double-click the clip length value and type 4.
Next, the grid.
By default, a double click in the note editor drops in a note that lasts a single 16th.
Our chords need to last a whole bar each.
You could drag every note out by hand.
That gets old fast.
Instead, find the grid setting, currently showing 1/16, and set it to 1 bar.
That hides all the small subdivisions, and now every note you double-click in lands a full bar long.
If you need fine detail later, set the grid back to 1/16.
It doesn't change any notes you've written.
It only changes how new notes go in.
2 quick tips while you're in here.
Hover over the left hand side of the editor, then click and drag right to zoom in, or left to zoom out.
And keep the preview headphone button on, because octaves matter.
The note names run in octaves: C2, C3, C4 and so on.
Higher number, higher pitch.
Sit around C3 for chords.
How to Find the Root Note for a Chord Progression
Step 1 of the system.
Every chord starts with a root note.
The root is the first note in the chord, and it decides where the progression feels like it's going.
Root notes that move up in pitch give you an uplifting sound.
Root notes that move down give you something more reflective and melancholic.
I'm feeling reflective today, so mine are heading down.
Draw 1 note per bar, 4 notes in total.
1 root for each chord.
Don't jump too far between them.
Moving 1 or 2 lines at a time is plenty.
Down 2, back up 1, that sort of shape.
Mute your drum track while you do this, so you can hear the movement on its own.
Press play and listen to the 4 notes loop.
You've probably heard that movement hundreds of times before.
That's fine.
Chord progressions get reused constantly in music.
Familiar works.
How to Use the 1 3 5 Rule to Build Chords in Ableton Live
A chord is a group of 3 or more notes that sound good stacked on top of each other.
So which notes stack well?
You count to 3.
Start on your first root note.
That's 1.
Count up the piano roll and skip a line as you go.
The line 3 up, counting the root as 1, is your third.
Double-click a note in there.
You'll see 1 empty line sitting between them.
Then count 1, 2, 3 again from the note you placed.
That's your fifth.
Note in.
Root, third, fifth.
A full chord.
Repeat on all 4 root notes and press play.
That's a chord progression.
Built by counting.
This only works because Scale Mode is doing the theory underneath.
Every line in the folded piano roll is a note in C minor, so the counting always lands somewhere right.
How to Use Chord Inversions to Sound More Professional
The progression works now.
It doesn't sound terrible.
But there's another level of motion available, and it takes about 10 seconds.
This is such a simple trick but in my experience is what changes the chords for the better.
Click the middle note of the first chord.
Hold shift and click the middle note of the other 3 chords, so all 4 are selected.
Now press shift and the up arrow.
All 4 notes jump up an octave.
Same notes, new order.
That's a chord inversion.
Here's why it works.
Think of a chord like a sandwich.
The root and the fifth are the bread.
Whatever sandwich you make, the bread stays neutral.
The third is the filler, and the filler is where all the flavour lives.
Moving the third up the octave puts the filler on top of the sandwich, where you can hear it clearly.
Play it back and the difference is obvious.
The chords sound more open and a touch more professional.
Like a keys player is playing them, rather than a mouse.
How to Add a Pedal Tone to a Chord Progression
The final step is a pedal tone.
A pedal tone is a single note that runs through the whole progression and ties the 4 chords together.
Finding one is trial and error, and I'll be honest about the odds.
Starting with the root note works all the time.
60% of the time.
So start there.
Take your first root note up the octave and draw it across all 4 bars, 1 note per bar.
It doesn't matter if it doubles a note already sitting in one of the chords.
Press play.
If something clashes, don't bin the idea.
Every note in the folded piano roll is in key, so they'll all work to some degree.
Select the pedal notes and nudge them up or down with the arrow keys until you land on a note that feels good.
Mine sounded odd on the first pass.
1 line up fixed it.
Then unmute your drums and hear the 2 parts together.
If the beat swamps the chords, pull a fader down until they sit balanced.
Final Thoughts on Writing Chord Progressions in Ableton Live
That's the whole system.
A root note, the 1 3 5 rule, an inversion and a pedal tone.
It gave you a 4 bar chord progression in C minor, built from scratch, with no theory in sight.
Now build your own.
Try a progression that climbs, then one that falls.
Test pedal tones that shouldn't work.
Some will sound great.
Some will sound terrible.
Delete the terrible ones and go again.
The goal at this stage is practising the system, not landing the perfect progression.
The counting does the rest.
This is 1 of 4 frameworks in my new Ableton Accelerator course.
It's designed to take you from an empty Ableton session to a finished song in just over 3 hours.
You can find out more about it here.
Ableton Live Chord Progression FAQ
Can you write chord progressions in Ableton Live without knowing music theory?
Yes.
Ableton Live's Scale Mode does the theory for you.
Set your key, turn on Highlight Scale, then press Fold to Scale so the piano roll only shows notes that are in key.
From there, chords are built by counting.
Start on a root note, count up 3 to find the third, then count up 3 again to find the fifth.
If you can count to 3, you can write a chord progression.
Should you write a chord progression in major or minor?
For electronic music, start in minor.
Most advice tells beginners to work in major, but major tends to sound a bit cheesy in electronic genres.
Minor keys give you more evocative, emotional progressions, which makes them a far more inspiring place to start.
This article uses C minor throughout.
The 4 step system works in any key though, so once you're comfortable, try both and let your ears decide.
What is a pedal tone in a chord progression?
A pedal tone is a single note that runs through the whole progression and ties the chords together.
A good starting point is the root note of your first chord, moved up an octave and drawn across every bar.
It works often, not always.
If it clashes, nudge the note up or down with the arrow keys until it sits right.
With Fold to Scale on, every option is in key, so something will work.
What is a third in a chord?
The third is the middle note of a basic chord, sitting between the root and the fifth.
It carries the character of the chord.
Think of a chord like a sandwich.
The root and the fifth are the bread, and the bread stays neutral whatever you build.
The third is the filler, and the filler is where the flavour lives.
Moving the third up an octave puts that flavour on top, where you can hear it clearly.
How do you write emotional sounding chords in Ableton Live?
Work in a minor key, since minor gives you more evocative progressions than major for electronic music.
The direction of your root notes matters too.
Roots that move down in pitch feel reflective and melancholic, while roots that move up feel uplifting.
Once the chords are in, move the middle note of each one up an octave.
That inversion opens the progression up and adds the motion that makes chords feel alive.
How do you write chords over drums in Ableton Live?
Build the chords in the same session as your drums, right next to the beat you like best.
Mute the drum track while you write, so you can hear the root notes and chords on their own.
Once the progression works, unmute the drums and listen to the 2 parts together.
If the beat swamps the chords, pull the drum fader down a touch until the balance between them feels right.
If you are interested in learning Ableton Live 12 or the Push 3 in a bit more detail, check the course here:
